|
|
Post by alainm on Oct 14, 2022 13:32:58 GMT 2
Stronglight plutôt que TA, diversité culturelle,?! Tu fais dans le régionalisme ... La loire contre l'aisne!
Non, moi je ne m'en lasse pas du TA.
|
|
|
|
Post by Munny on Oct 14, 2022 14:06:44 GMT 2
Non.
Je parle de ma collection.
Des Campas, à la pelle.
Des TA, de tous types, avec adaptateurs ou pas
Donc là, oui, diversité par rapport à mes autres vélos.
Et uniformité dans le vélo. Alignement sur le trou.
|
|
|
|
Post by Munny on Oct 14, 2022 14:30:02 GMT 2
Comme cela génère de l'intérêt, un petit update ce midi : une partie de ce que je dois faire sur la fourche. J'avais des doutes... Tout d'abord, assez rapidement j'ai dû me rendre à l'évidence. Les pattes sont prévues pour des axes de 8. D'où le laçage d'une paire de roue. Mais à part cela, souvent on se rends compte qu'il n'y a pas plus commun que les fourreaux de fourche ayant souffert. Donc on redémonte ...  Work on fork Work on fork by bagheerabe, on Flickr 3 pas en arrière... Sur le pivot, un O.  Work on fork Work on fork by bagheerabe, on Flickr O Fortuna ? Ben non. Je ne saurais jamais pourquoi. Quand on a des doutes sur la fourche, il est temps de sortir le calibre d'alignement  Work on fork Work on fork by bagheerabe, on Flickr S'il faut, j'expliquerai. Avec cette fourche ci ...  Work on fork Work on fork by bagheerabe, on Flickr Bingo! Un petit problème. Elle serre trop d'un côté. La jauge doit pouvoir passer entre les pattes  Work on fork Work on fork by bagheerabe, on Flickr Est-ce assez clair ? Et là?  Work on fork Work on fork by bagheerabe, on Flickr Donc, se souvenir de l'enseignement du vénéré grand maître Jacques Van Genk: "Vas-y, c'est pas du nougat!" Quelques Oumph plus tard...  Work on fork Work on fork by bagheerabe, on Flickr Au passage, 1) on voit des traces de la peinture d'origine 2) la finition aux pattes Et donc, là cela passe à présent.  Work on fork Work on fork by bagheerabe, on Flickr C'est même parfaitement centré. Passons à la suite. 1) je coince la fourche dans mon étau  Work on fork Work on fork by bagheerabe, on Flickr Avec des mortaises en bois pour éviter de déformer les foureaux 2) Une passe sur les filetages. Outil périod correct choisi afin de bénéficier de la filière déjà un peu usée. Ne pas tout foirer ...  Work on fork Work on fork by bagheerabe, on Flickr Résultat ...  Work on fork Work on fork by bagheerabe, on Flickr Comme je m'y attendais. La cuvette mobile supérieure de direction était trop dure... On voit mieux en vrai mais la filière n'a fait sa marque que dans la partie basse du filet. Zone plus claire. Et là, cela va mieux, sans tourner trop facilement. Je ne sais plus ou j'avais vu quelqu'un se poser des questions sur un pivot de fourche rétréci au niveau du filetage. On a toujours plus ou moins cette impression, due à une illusion d'optique. La zone filetée apparaitra comme d'un diamètre plus faible ... |
|
|
|
Post by Munny on Oct 16, 2022 10:53:25 GMT 2
Il y a encore un truc à faire avec cette fourche. Fourche avant et arrière ... Je vais y rajouter des tasseaux ce qui permet de positionner au mieux les freins. Idélement il me faudrait des Mafac long reach mais cela diminue la force de freinage, alors qu'en repositionnant le point de pivot, on obtient le bon résultat. Donc les tasseaux... Ben, j'en ai pas en stock. J'ai des tasseaux pour Cantilever Mafac, pour cantilever VTT mais pas pour ces étrier là. Je considère sacrifier une fourche Peugeot PY10 à tasseaux mais là, cela n'en fait que 2. La fourche  Mafac Brakes plots Mafac Brakes plots by bagheerabe, on Flickr Elle a été bariolée par un proprio précédent, mais cela n'est pas un problème Si je regarde le support d'étrier Mafac...  Mafac Brakes plots Mafac Brakes plots by bagheerabe, on Flickr Ces tasseaux correspondent à ceux de cette fourche  Mafac Brakes plots Mafac Brakes plots by bagheerabe, on Flickr L'idée, donc est de débraser là pour rebraser sur la fourche Lyonnaise. Mais, défaire, c'est toujours plus facile que faire. Pour faire (et donc braser correctement ces tasseaux) un petit accessoire est indispensable  Mafac Brakes plots Mafac Brakes plots by bagheerabe, on Flickr Cet outil sert à positionner correctement les tasseaux avant brasage. Comme ceci  Mafac Brakes plots Mafac Brakes plots by bagheerabe, on Flickr Outil en provenance des ateliers du VGM, rue de la Rosée J'ai bien récupéré là des tasseaux pour Cantilever (le kit complet) CLB mais si très léger, je reprendrai l'appellation VLEK de Alain... Les cadreurs avaient, ou créaient des outils pour braser les tubes. Pour éviter que les pièces ne bougent... Mister Ming, je ne pense pas que le calibre de positionnage de la patte Cyclo soit très difficile à réaliser. TOut comme la patte : une rondelle et 2 bouts de tiges cintrées (voire plus , ou même moins, suivant le cadreur) |
|
|
|
Post by Munny on Oct 16, 2022 10:54:07 GMT 2
Bon...
Ceci ne résoudrait qu'a moitié le problème car il manque 2 tasseaux
|
|
gazellecm
Doc
Puis j’avoir accès à la section “Doc”.
Posts: 97 
|
Post by gazellecm on Oct 17, 2022 2:06:16 GMT 2
Est-il possible de démonter les tassaux du support Mavic? Ça l’air de l’acier en support alu.ou les faire sur un tour.
|
|
|
|
Post by bduc61 on Oct 17, 2022 10:49:52 GMT 2
Il y a encore un truc à faire avec cette fourche. Fourche avant et arrière ... Je vais y rajouter des tasseaux ce qui permet de positionner au mieux les freins. Idélement il me faudrait des Mafac long reach mais cela diminue la force de freinage, alors qu'en repositionnant le point de pivot, on obtient le bon résultat. Donc les tasseaux... Ben, j'en ai pas en stock. J'ai des tasseaux pour Cantilever Mafac, pour cantilever VTT mais pas pour ces étrier là. Je considère sacrifier une fourche Peugeot PY10 à tasseaux mais là, cela n'en fait que 2. La fourche Mafac Brakes plots by bagheerabe, on Flickr Elle a été bariolée par un proprio précédent, mais cela n'est pas un problème Si je regarde le support d'étrier Mafac... Mafac Brakes plots by bagheerabe, on Flickr Ces tasseaux correspondent à ceux de cette fourche Mafac Brakes plots by bagheerabe, on Flickr L'idée, donc est de débraser là pour rebraser sur la fourche Lyonnaise. Mais, défaire, c'est toujours plus facile que faire. Pour faire (et donc braser correctement ces tasseaux) un petit accessoire est indispensable Mafac Brakes plots by bagheerabe, on Flickr Cet outil sert à positionner correctement les tasseaux avant brasage. Comme ceci Mafac Brakes plots by bagheerabe, on Flickr Outil en provenance des ateliers du VGM, rue de la Rosée J'ai bien récupéré là des tasseaux pour Cantilever (le kit complet) CLB mais si très léger, je reprendrai l'appellation VLEK de Alain... Les cadreurs avaient, ou créaient des outils pour braser les tubes. Pour éviter que les pièces ne bougent... Mister Ming, je ne pense pas que le calibre de positionnage de la patte Cyclo soit très difficile à réaliser. TOut comme la patte : une rondelle et 2 bouts de tiges cintrées (voire plus , ou même moins, suivant le cadreur) Sur la patte cyclo oui peut etre pas trop dur mais j en ai deja parlé - il faut quand meme "recheflir" au deport lateral et vertical par rapport a la patte de l axe de roue arriere en fonction des pignons et de la RL qu on veut mettre..... ici des extraits d'un post ClassicRendezVous ou c'est discuté - Courtesy CRV donc On Monday, May 6, 2019 at 3:01:19 PM UTC-7, bduc61 wrote: I have a frame being restored and it needs a Cyclo hanger. I wish to confirm the exact positioning of a cyclo hanger "head" ie the circular piece that ends the hanger and receives the derailleur axis. I actually wonder if it depends on the maximum cog you wish to be accepted and the number of speeds. I think the cog should have an impact but the number of speeds probably not because its the rear width of the frame that allows the speeds number. On an existing bike - with a 5 speed derailleur ( so 120mm width) and a 24 max cog, I have measured the different distances horizontal distance between the wheel axis and the derailleur center axis : 70 mm ( projected on a horizontal axis) You might find this page helpful. It's for a Cyclo UK 2 or 3-speed but since the mechanism is essentially the same, I don't think the UK Cyclo would set up differently from the French, nor would the later 4 and 5-speed versions differ.
www.classiclightweights.co.uk/standardcyclo.html
According to that page, the center of the head should be positioned to leave a close gap between wheel and cog when in the largest cog.
Hard to read but the chart seems to go like this:
(Cog tooth count - distance from the center of the dropout slot to the center of the head inches (mm))
18t - 2-1/8" (54mm)
19-20t - 2-1/4" (57mm)
21t - 2-7/16" (62mm)
22t - 2-1/2" (63.5mm)
23t - 2-9/16" (65mm)
24t - 2-5/8" (66.5mm)
26t - 2-3/4" (70mm)
28t - 2-7/8" (73mm)
After 20t, each cog tooth increase calls for 1/16" (about 1.5mm) increase in the distance. So your measurements appear to be for a 26t max rear cog. Your theoretical 30t, following this pattern, would need a distance of about 3" (76mm).
(Given the 1/2" pitch and 3/32" width of chains and cogs, using inches to calculate the dimensions might be a little easier than mm.)
Vertical distance between these two points ( projected on a vertical axis) : 45mm It stands to reason that the offset in the vertical axis can simply fall where it may, following the angle of the chainstay, as that would also help accommodate the larger diameter of a larger rear cog. It may not make much of a difference, but you could increase that offset if the chain follows too extreme of an angle from the upper jockey wheel to the rear cog.
Lateral distance between the rear dropout and the derailleur hanger : about 25 to 27mm.
I do not believe the lateral offset of the head relative to the rear dropout face would be different for different numbers of speeds, as that is accommodated by the length of the derailleur axle. I would think all models should have the same offset. (To that point, I don't believe Cyclo UK made clamp-on hangers in different offsets, but I think I have a few and I could check.)
I analyse that increasing the max cog to 28 teeth or 30 teeth ( so increasing the diameter of the freewheel) should possibly push the hanger axis further to the right and further down so that the derailleur does not interfere and leaves sufficient space between both when the chain is on the biggest cog?
Maybe the distance between the tangential line of the freewheel biggest cog circumference and the tangential line of the derailleur wheel circumference is the key, measured with both lines being parralel ?
But maybe the impact should not be linear - to allow a good "average" chainwrap, its the middle cog dimension that should be taken into account and not the biggest - at least for the vertical measurement to the wheel axis ?
As noted above, it is the largest cog that sets the horizontal distance, not the middle. However, for a single chainset, the middle cog would be where I would set the chain to size, such that the derailleur jockey wheels are oriented vertically to each other when in the middle-sized cog. For a double chainset, the chain length should be set so that your big cog/big ring combination will still leave some slack in the chain such that it still follows a dogleg path through the derailleur jockey wheels. If this can't be accomplished, then you'll have to studiously avoid cross-chaining, or try to find a longer jockey wheel cage, if such a thing exists. Or you could have one cut out of flat aluminum plate.
Greg Reiche
Cycles Hibou
San Diego CA USABruno,
<< horizontal distance between the wheel axis and the derailleur center axis : 70 mm >>
<< Vertical distance between these two points ( projected on a vertical axis) : 45mm >>
This piqued my interest, and curiosity, so I measured 3 of my bikes with 5-speed Cyclo derailleurs, all 3 bikes from the early to mid '50s, as follows:
Herse: horizontal distance = 55 mm; vertical distance = 85 mm.
Pitard: horizontal distance = 65 mm; vertical distance = 70 mm.
Routens: horizontal distance = 75 mm; vertical distance = 65 mm.
I don't think I was measuring incorrectly. My measurements may be off by + or – 5 mm, or maybe more, but I did triple check each measurement. All 3 bikes currently have 26 tooth large cogs, although that may not be what they had originally.
Perhaps most interestingly -- and even if I measured wrong -- they all shift over the 5-speed range without issue, although the Routens shifts perhaps marginally better than the other 2. I can only guess that each builder must have placed the derailleur in the position that he thought was best, even if it went against Cyclo recommendations. And in my experience it just doesn't seem to make much difference. Perhaps that's one benefit of these Cyclo derailleurs -- they just seem to work no matter what (that is, until they get dirty!).
Like everything else, however, I'm sure individual experiences with these derailleurs vary widely, especially with those who may be more sensitive to shifting nuances and subtleties than I am.
Gary DellaRossa,
Toronto, Canada.Et Voila un chart  I have charted the different positions and find that you could more or less draw a circle which would minimize the "least squared distances" to the perimeter of the circle for Gary's bikes. And the radius is 95mm ! My mystery bike MB stands strangely out of this crowd. Vertical positioning is high compared to the others. will probably go for a Routens positionning 75/65. For the lateral positionning , I am trying to assess what is needed to reach all the cogs ( especiallt the highest one) but without interfering with the spokes of the wheel. As the length of the derailleur axle is about 73mm of which about 17mm are threaded. If the axis is bolted in the middle of the threading , it means that the axis is going to protrude 41 mm inside the dropout line if the hanger is positionned at a distance of 25mm outsIde the dropout. ( 9mm of threaded axis + 14 of unthreaded axis outside). hope you follow me ;-) On a 120mm rear width , it means that you eat "inside' the righthandside half by these 41mm. Gary would be interested if you asseses this lateral positionning on your three bikes. Seems about 25mm is common ( I measured about that on three bikes ) Hi Bruno,
<< Gary - would be interested if you asseses this lateral positionning on your three bikes. Seems about 25mm is common... >>
It was difficult getting accurate measurements without taking everything apart, so these are only approximate. All 3 bikes use Cyclo 5V derailleurs with 75mm axle lengths, and 19mm of threading.
Herse: outer face of the hanger positioned 25mm to the outside of the dropout face, with 10mm of the axle sticking out from the hanger (the outside nut hides some of that), and about 8mm clearance to the spokes. This bike uses an RAS split-axle rear hub, which has its own peculiarities in terms of freewheel positioning (ie., there seems to be more space between the largest cog and the spokes).
Pitard: the same 25mm to the dropout, with about 12mm of axle sticking out, and 6/7mm spoke clearance.
Routens: this is the outlier, with about 20mm to the dropout, 12mm of axle sticking out, and 11/12mm spoke clearance. I think the difference here is because of the deep 3D Nivex dropout with the built-in chainrest. The odd shape of the dropout made measuring even more difficult, and it seems oddly-positioned compared to the regular dropouts of the other two bikes.
I'm not sure that I understand your 41mm "inside the dropout line" measurement, but maybe it doesn't matter.
I hope this helps, rather than hinders, your efforts!
Gary DellaRossa,
Toronto, Canada |
|
|
|
Post by Munny on Oct 17, 2022 18:46:14 GMT 2
Ah, cela me rappelle tes demandes sur le positionnement des pattes de mes cyclos.
Ne serait-il pas approprié de sortir ceci et de créer un post dédié?
|
|
|
|
Post by Munny on Oct 17, 2022 18:49:24 GMT 2
Est-il possible de démonter les tassaux du support Mavic? Ça l’air de l’acier en support alu.ou les faire sur un tour. Bien vu! C'est effectivement des tasseaux acier rivetés sur le support Mavic. Mais, séparer l'un de mes innombrables Raid ou Dural forge? Ou donner cela à un tourneur pour qu'il prévoie le déport, le trou, ... |
|
|
|
Post by bduc61 on Oct 18, 2022 14:47:17 GMT 2
Ah, cela me rappelle tes demandes sur le positionnement des pattes de mes cyclos. Ne serait-il pas approprié de sortir ceci et de créer un post dédié? indeed - je vais le faire ... |
|
|
|
Post by Munny on Jan 10, 2023 17:06:08 GMT 2
J'ai commencé à préparer le cadre. Donc retirer la peinture.  Fourche Lyonnaise Fourche Lyonnaise by bagheerabe, on Flickr Oui, la première peinture est d'un vert trop acide à mon gout. Je m'attends à du rouge à certains endroits Pas de trace de pattes débrasées - Il était possible que des supports de cantilever aient été retirés. Grosse surprise : la qualité des brasures. 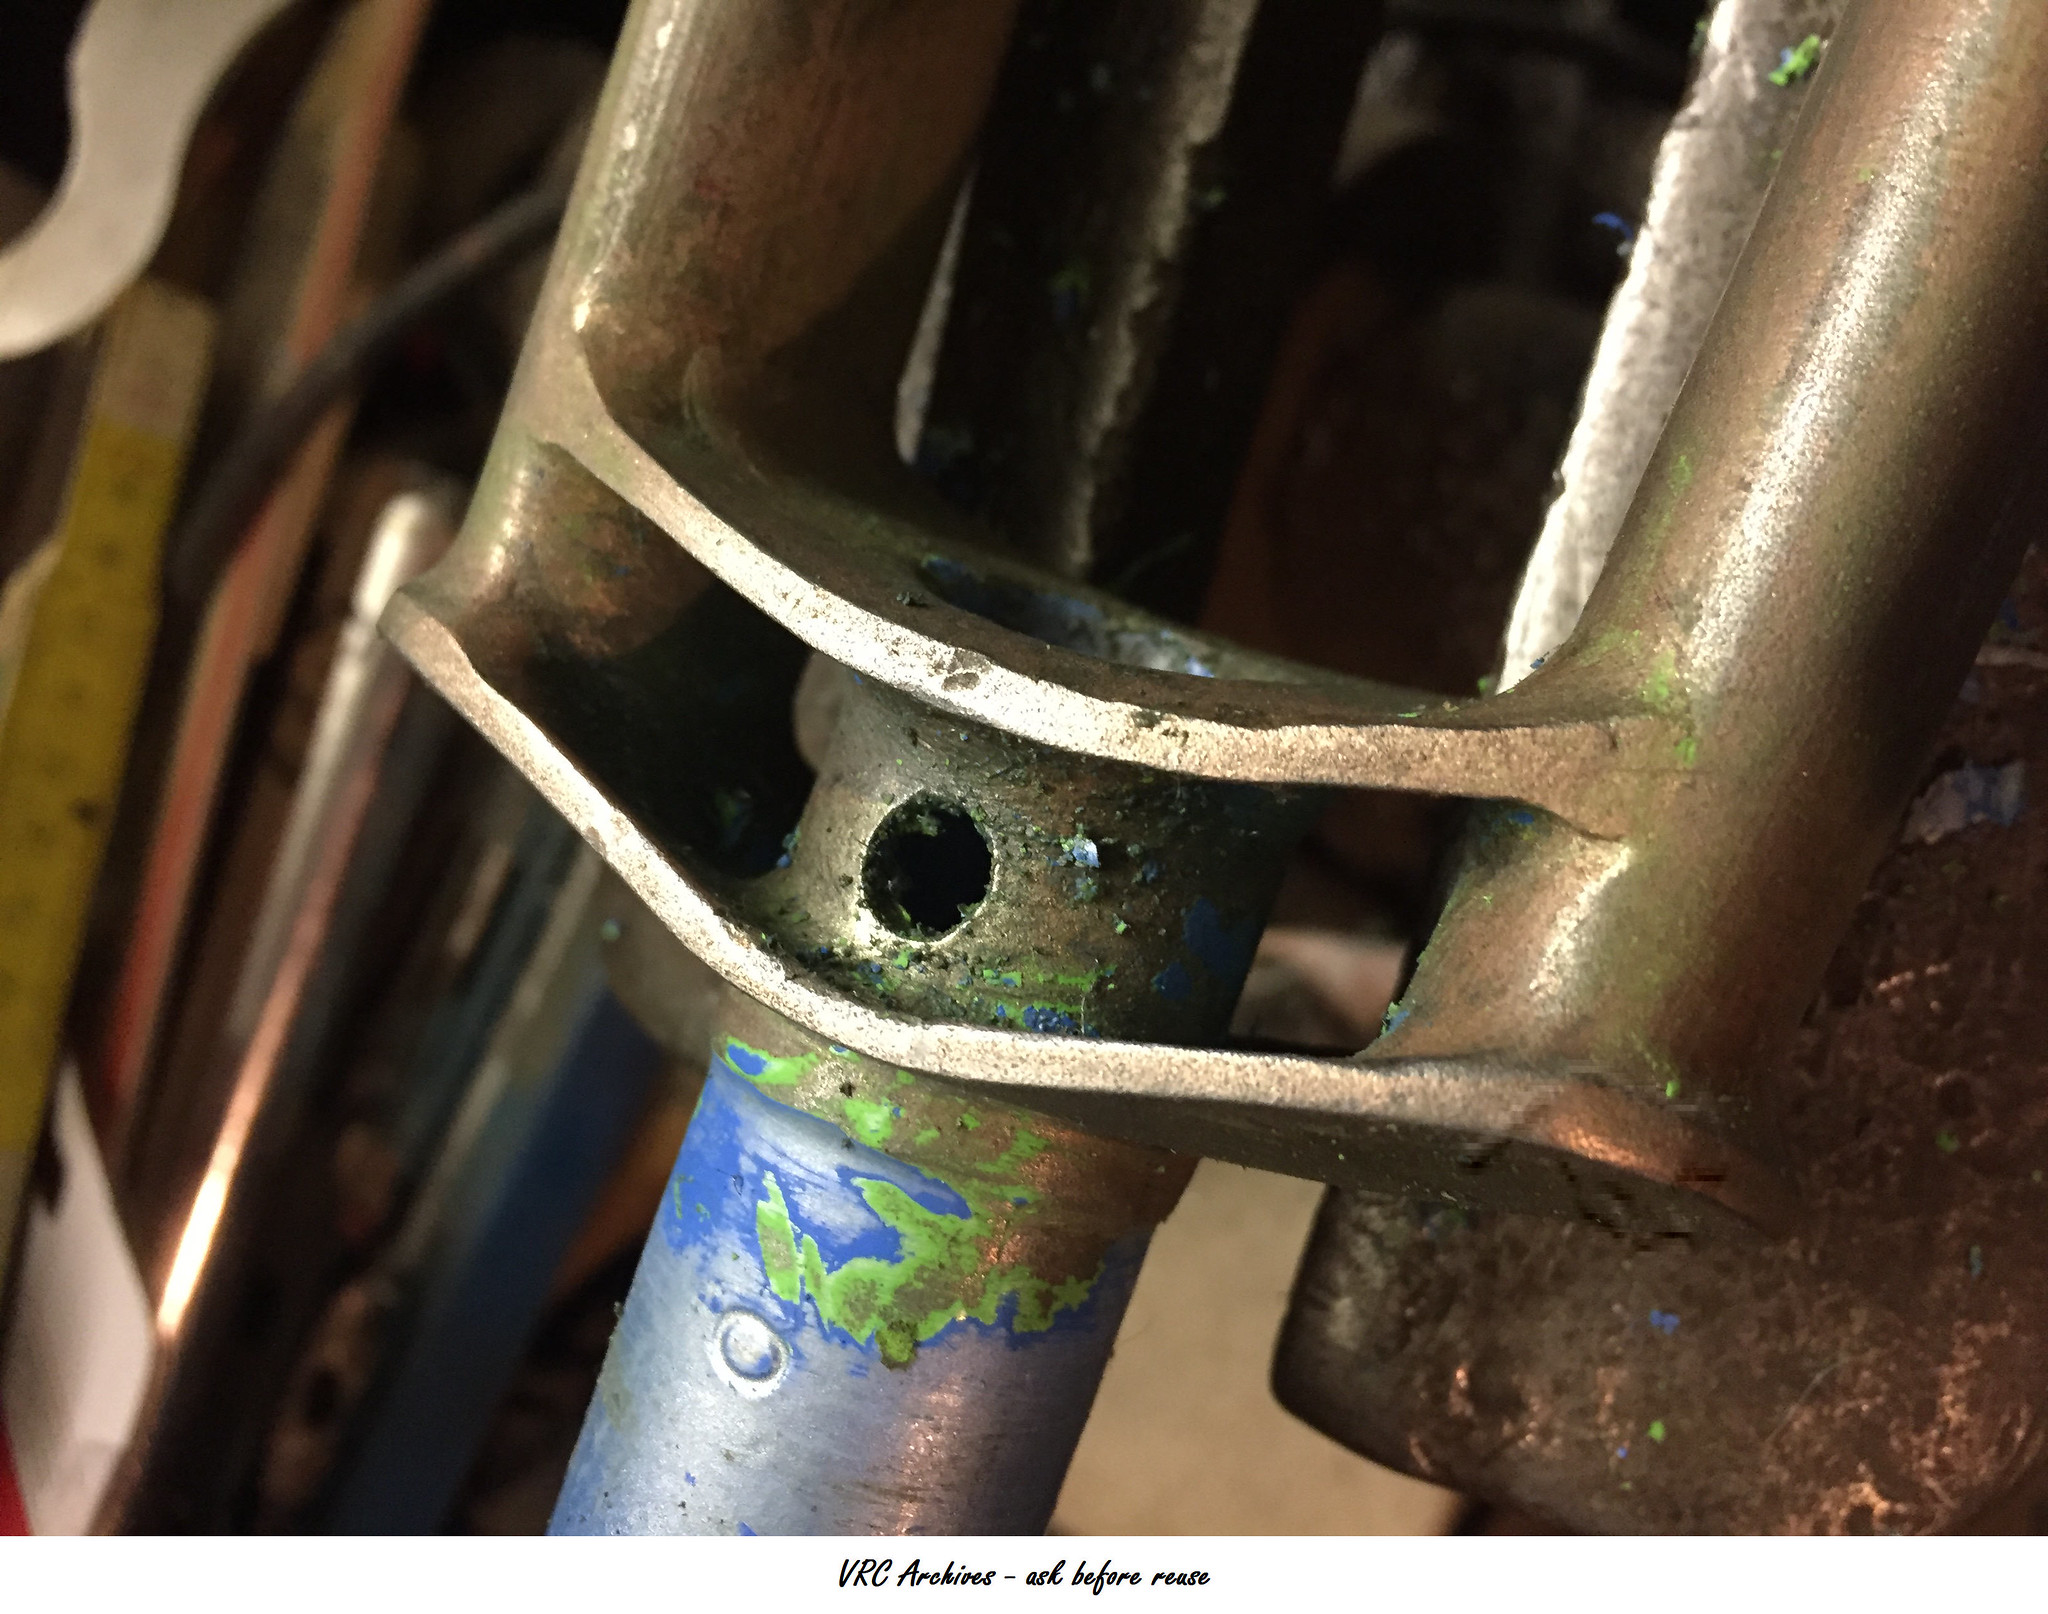 Fourche Lyonnaise Fourche Lyonnaise by bagheerabe, on Flickr Presque invisibles. Très peu de traces de lime. On dirait que le cadre a été cuivré.  Fourche Lyonnaise Fourche Lyonnaise by bagheerabe, on Flickr Sur cette photo, on aperçois, sur le côté intérieur du fourreau gauche, un estampage en losange. Il est présent sur les 2 faces des fourreaux, au même endroit. Mais de là à pouvoir le prendre en photo ... Ou même à lire ce qu'il représente.... Sur l'un d'entre eux je pense apercevoir un A, tandis que sur un autre, j'y vois un dessin Donc rien de concluant sur les tubes Cela ne ressemble ni à la colombe italienne ni au reynolds anglais. Sous le pivot ...  Fourche Lyonnaise Fourche Lyonnaise by bagheerabe, on Flickr Rien ... Sinon des soudures de très haute qualités  Fourche Lyonnaise Fourche Lyonnaise by bagheerabe, on Flickr On dirait que les tubes sont fondus l'un dans l'autre ... Travail parfait ! |
|
|
|
Post by bduc61 on Jan 10, 2023 19:15:18 GMT 2
ben c'est pas soudobrasé alors mais bien soudure autogene ?
|
|
|
|
Post by Munny on Jan 10, 2023 20:56:04 GMT 2
ben c'est pas soudobrasé alors mais bien soudure autogene ? C'est ce que je pensais au début. Mais... De l'autogène cela se lime et cela va laisser des traces. Et sous la tête, tu remarques un minimum de brasure. Je vais ressortir mon soufflet Novoflex pour macro avec l'espoir? de capturer cela. C'est surprenant. Pour moi, on dirait du brasage avec quasiment pas d'épaisseur et ? sans limer ? |
|
|
|
Post by Munny on Jan 10, 2023 21:40:22 GMT 2
Je viens de faire une photo (mauvaise) du meilleur logo sur les fourreaux de fourche  IMG_6182B IMG_6182B by bagheerabe, on Flickr En vrai, on distingue bien le A, moins ce qui pourrait être un fragment de B, ou autre lettre approchante. Cela ne me parle pas |
|
filoo
Section Restreinte 
Posts: 2,000
|
Post by filoo on Jan 11, 2023 23:40:46 GMT 2
Le A désaxé par rapport au sommet du losange... STAR !
Curieux, cet amincissement au milieu de la plaquette supérieure sur la tête de fourche... ?
|
|


